Watch our Advanced Market Maker in Action
GETTING THE RIGHT FILES
First you need to download the required files.
Let’s go to github for that here and download the zip file
https://github.com/redlon23/HFTMarketMaker
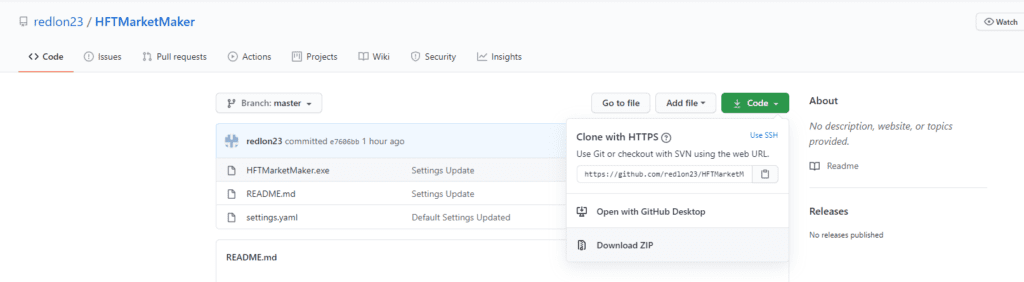
Once you get the files, you will have the following folder without the “permission error” file. That will only be created if an error occurs. All you have to start editing the “settings page” and starting the HFT Market Maker file

When you need to put a number for anything to do with percentage, please put the number like you say it. If you want 1%, put only 1 and not 0.01. If you want 0.1%, please only type 0.1.
SET UP
Hosting: This isn’t a piece of the settings page. However, we would like to mention that you will need a place to host the bot. It can be your personal desktop or laptop. Though, if you would like the bot to be running 24/7, we advise using a VPN service. Please read our Hosting Guide if you are unsure about how to set up your server.
License key: Please put the license key provided by HFT Research upon your purchase. The bot will not work without the license key.
Platform: Please select what exchange you would like to run the bot. Currently we support ByBit and Binance. It is important to note that, Binance has a lot of more frequent price actions than ByBit does. So, the amount of times you get filled in a day exponentially increases. If you are making your math based on daily fill rate, then Binance might be dangerous for you. Because, ByBit moves in the increments of 0.5$, you don’t get filled as much. However, on Binance, price moves in every 0.01$, so you get filled a lot more on Binance than ByBit. A market maker in Binance gets 5 times more fills than a market maker in ByBit.
Also, ByBit pays 0.025% rebate for limit orders while Binance charges 0.02% for limit orders. However, if you are using, trailing take profit, ByBit will charge you 0.075% for market order and Binance will charge you 0.04%. Ultimately, on ByBit you will end up paying 0.05% fee and 0.06% on Binance. We advise to use ByBit if you are using ONLY limit orders. Otherwise, the difference is minimal.
Currently we only support, ByBit USDT contracts and Binance Futures. We will add more exchanges and markets very soon!
Public Key: Place your public API key here
Secret Key: Secret API key goes in here
Symbol: Currently, ByBit USDT contracts only offers BTCUSDT pair. However, if you chose to use Binance, you can choose any of the available pairs in futures.
Interval: This is how often and frequent the bot will place orders. We advise keeping this at 60 seconds. So, every minute, the bot will place new limit orders and update the price of your take profit and stop loss prices if needed. It gets riskier as you shorten the interval. With 60 sec intervals, you know that the maximum amount of time you can get filled is 1440 times as that’s the number of minutes in a day. When adjusting this setting, please calculate how many times you can get filled and how long you can keep buying before you run out of capital.
OPENING POSITION
Trading Side: Choose if you would like to be a market maker on the long or the short side. Please read our guide inherit dangerous of inverse contracts.
Auto open position: By turning this on or off you let the bot know if it should get back into trading after closing a position. If this is on, the bot will wait number of seconds mentioned in the settings below before opening another position. We suggest that using another trigger or manual entry is better than having auto position open on. However, if you are going to keep auto position on, then we advise to keep a long cool down.
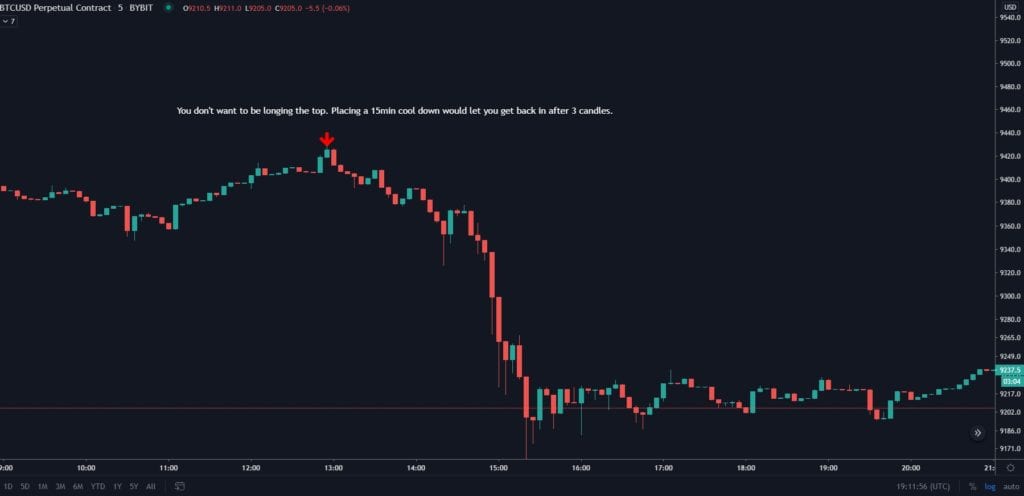
Cooldown: If you are using the bot with auto open position off, then you can ignore this setting. Otherwise, please choose how long you want the bot to wait after closing a position and before opening a position. THIS IS IN SECONDS.
5min in seconds = 300
1 hour in seconds = 3600
If your entry side is buy, the bot will ignore all the short signals generated and vice versa. It will trade one side of the market!
Use SMA: You can choose to use SMA as an indicator to use for your entry. If the price is above the SMA, the bot will look to long. On the contrary, if the price is below SMA, the bot will look to short. You can turn this on and off.
smaLength: Here you can select the length or period of your SMA length. Some popular ones are 21, 50, 100 and 200.
smaTimeFrame: You can select the timeframe for SMA here. Some popular ones are min60, min240, day
useBB: Here, you can choose if you want to use Bollinger Bands as an indicator for your entry. If the price is below the lower band of Bollinger Bands, the bot will trigger a long given that the price is also above the SMA length if you are using that as well.
bbLength: Select the length of your Bollinger Bands. The most common is 20.
bbTimeFrame: Choose the time frame for Bollinger Bands. It can be different than SMA length if you are using.
Thoughts
There are a few different strategies you can make of using these different strategies.
- Some traders prefer to select SMA on a higher time frame like 4 hours or daily which lets them see the bigger picture. On the other hand, they select a lower time frame for Bollinger Bands in order to get in at the small dips while the overall market is bullish. The same strategy can be applied for the short side if the trader is feeling that the market is bearish.
- Some more conservative traders prefer to use both indicators on higher time frames such as daily SMA and hourly BB. Therefore, they deploy more capital into each trade and order which compensates the lack of activity due to trading higher time frames.
MANAGING POSITION
Scale order size value: This is the contract size that the bot will place at each interval. We advise to keep this at the minimum for a few days until you get a full grasp of the concept. Though, we are always eager to chat, help and strategize with you on Discord and Telegram.
How to calculate Order Size?
First, you need to calculate your max contract size. As a general rule of thumb, market makers want to be ready and keep enough funds to continue market making for 48 hours. A trending down market will get you filled about 30 times an hour. So, if you want to market make for 48 hours, you need to have 48×30=1440 orders. Therefore, we divide the max contract size by the total number of orders we will need. This will tell us how much our order value should be.
Max contract size: This is an extremely important setting. This is the number of contracts that when your open position gets to this number, the bot will stop adding onto the position in order to avoid excessive risk.
How to calculate max contract size?
For cross leverage users;
It is a safe practice to use 3% of your account balance at maximum as this will keep your liquidation levels relatively healthy.
Go to the exchange and set your leverage. Then, hit market order and see what is the maximum position size you can have.

Now take 3% of that size and that will be your maximum contract size. In this case it is 4.087 x 0.03 = 0.12261
For isolated leverage users;
If you are using isolated leverage, you can safely choose 3x or whatever you see fit and deploy all of your capital as your max contract. Since, the use of capital will not affect your liquidation price as it is in cross, you can use 100% of your balance on low leverage. So,whatever “Max” contract the exchange is telling you, you can use that.
We advise that, if you are using cross leverage, you should maximum risk 3% of your capital. So, placing a max contract size that equals to 3% of your balance would be a good risk measure. Otherwise, we suggest running the bot on 3x and using the full capital with it.
PROTECTION
Use buy protection: This piece of setting is a unique feature our market maker. It will look at the 1 hour price change of the asset you are trading. If the asset has dropped by x% specified below, the bot will double the contract size to get filled at a cheaper price. On the other hand, if the asset goes up by x% percentage specified below, the bot will cut the contract size in half to get filled at a more expensive price. It will work the other way around for shorts. It will buy more when the price pumps and it will buy less when its crashing by x%. Turning this on and off will make use of the following piece of setting or not.
It is important to note that if you are using the minimum contract size, you cannot cut your size in half. Because the exchange will refuse your order size as it’s below the minimum contract size. Market makers should be aware of it
Buy proception percentage: The number you put in here will affect when to double buy or half buy.
No trading zone size: This is an extremely important safety mechanism. You have max contract size where the bot will stop trading. However, you can have another safety mechanism that will kick in before you hit the max contract size. Why? Let’s explore it. Market making is a consistent way of making steady profits. However,market maker gets in a sticky situation when market goes sideways and you slowly increase your position size. Then a big crash comes out of nowhere. You are close to hit your maximum size because you have accumulated quite a bit from the side range movement. Like the example below.

In order to avoid this exact situation, we have come up with this piece of setting. Say that your max size is 1 BTC. So, the bot will stop trading when your position size is 1 BTC. You can select your no trading zone as 0.5 BTC. As a result, when your open position gets to 0.5 BTC the bot will look at the setting below. If it is true, it will stop trading before you hit max contract size.
No trading zone range: Here, you choose when the bot should start trading again after stopping at the setting above. Though, it should start buying back because we haven’t hit max size, right? Yes! Here you choose when to start placing orders again. If your entry price is this much far away from the current price, the bot will turn back on and work its way to max contract size.
For example, your entry price is 10,000 and you have hit no trading zone size at 0.5 BTC size. If you choose 500$ as your no trading zone range, the bot will wait until price gets down to 9500 in order to start placing orders again and ultimately stop at your max contract size. This way you avoid getting loaded up at a sideways range and be exposed to excess risk.
CLOSE POSITION
Type of TP: Select your desired take profit type: Current options are limit and take profit. We are also working on ladder TP!
Limit TP percentage: This is the percentage where the bot will maintain a take profit limit order.
If “trailing” doesn’t mean anything to you or what you read below doesn’t make sense please watch this video where we demonstrate trailing take profit.
Trailing Start: This is only valid if you chose trailing TP as your TP option. This is the percentage when the bot will start trailing. So, if you want the bot start trailing at 1%, this is where you put 1.
Trailing Percentage: This is only valid if you chose trailing TP. This is how far behind you want to trail the price. This number must be smaller than the number above. If you start trailing at 1% with say 0.2%, the bot will place a stop loss order at 0.8% and will keep moving it up staying 0.2% behind of the local high.
Use Stop Loss: Turn this on or off depending on if you want to use stop loss.
If you exercise good risk management, market maker should be safe to run without a stop loss.
Stop Loss percentage: The % value where you want to have your stop loss.
Read our Medium Post about effective market making strategies here
Check out our other bots here